Premiere Pro Introduction
Adobe Premiere Pro is a programme designed to work fluently with After Effects and Media Encoder, all interlinking for efficient video editing. Premiere Pro specialises in compositing clips, formatting, and colour grading. Premiere Pro also supports basic audio editing, but this isn't as professional as Adobe Audition.
When setting up a new project, it's important to keep track of files; the programme makes links rather than importing. This means files are lost from projects when they are lost in their original saved location. Files will also require a reload if their destination on a computer changes.
The standard editing workspace has four main sections, as seen below. An area for media files, a timeline, a preview screen, and a space to edit individual files. The bar on the far left can be removed for optimum workspace.
The image below shows each of the four sections at work. The top left shows a paused preview of my project. The top right shows an individual clip being edited. The bottom right shows my timeline filled with files, and the bottom left shows the files I am using for this project, files with links.
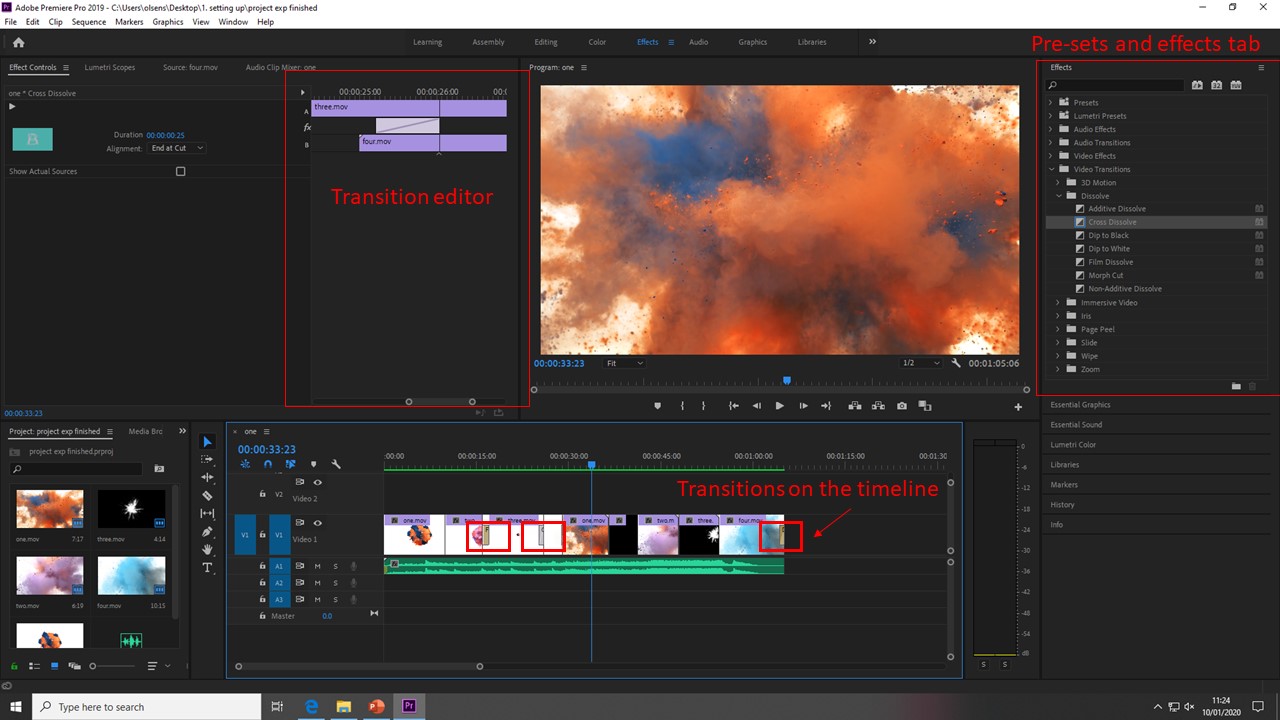
Below, the image demonstrates the ability to add effects and presets to a project. In this example, transitions have been used to polish the hard cut between different clips in the timeline. These can be adjusted to cover different areas of two clips, and can also be shortened or stretched.
Before a finalised project can be exported, it must be rendered. Pressing the enter key will begin the rendering process, and the red bar above the timeline will turn green when this is complete. Next, the project can be exported. The image below shows the options that can be adjusted to suit the end product.
Speed and reverse can be altered through the 'speed and duration' tab, as seen in the below image. clips can be played backwards, and the duration of a clip can also be changed.
'Effect Controls' work in a very similar way to after effects; key frames are used to adjust how an effect appears over a clip. For example, a clip may begin crisp and gradually become more blurry.
Scale is an adjustable option that can be reached through the 'Effect Control' tab, the below image shows how the scale of four images has been reduced, and re-arranged onto the screen.
The razor tool can crop clips within the timeline. This is useful for cutting multiple pieces of footage to the same timestamp with accuracy.
When setting up a new project, it's important to keep track of files; the programme makes links rather than importing. This means files are lost from projects when they are lost in their original saved location. Files will also require a reload if their destination on a computer changes.
The standard editing workspace has four main sections, as seen below. An area for media files, a timeline, a preview screen, and a space to edit individual files. The bar on the far left can be removed for optimum workspace.
The image below shows each of the four sections at work. The top left shows a paused preview of my project. The top right shows an individual clip being edited. The bottom right shows my timeline filled with files, and the bottom left shows the files I am using for this project, files with links.
Below, the image demonstrates the ability to add effects and presets to a project. In this example, transitions have been used to polish the hard cut between different clips in the timeline. These can be adjusted to cover different areas of two clips, and can also be shortened or stretched.
Before a finalised project can be exported, it must be rendered. Pressing the enter key will begin the rendering process, and the red bar above the timeline will turn green when this is complete. Next, the project can be exported. The image below shows the options that can be adjusted to suit the end product.
Exported Test
Speed and reverse can be altered through the 'speed and duration' tab, as seen in the below image. clips can be played backwards, and the duration of a clip can also be changed.
'Effect Controls' work in a very similar way to after effects; key frames are used to adjust how an effect appears over a clip. For example, a clip may begin crisp and gradually become more blurry.
Scale is an adjustable option that can be reached through the 'Effect Control' tab, the below image shows how the scale of four images has been reduced, and re-arranged onto the screen.
The razor tool can crop clips within the timeline. This is useful for cutting multiple pieces of footage to the same timestamp with accuracy.


Comments